Section II - Basic Waypointing
The Node Hud
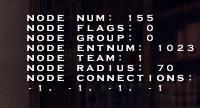
After you enter the command node_drawhud mentioned in the previous section you'll see a hud menu off to the right of the screen in-game that looks like so.
Now let me explain what each of the above options mean.
Node Num = This is the actual node number you are currently near, this is also shown on the top of the node itself (see pic below)
Node Flags = This indicates if the indicated node has any flags set. A value of 0 means that the node has no special flags set. (We'll get into flags later)
Node Group = This is used to group certain Nodes together to be turned off and on using the script system a value of 0 means it's not in a group and is open to the bots (We'll get into this later)
Node Entnum = This tells the bots that this particular node is next to a specified Entity the default value for all nodes for this option is 1023 (we'll get into this later as well)
Node Team = This indicates which team this node is available to, only that specified team can use the node, a value of 0 means the node is open to any team (we'll get into this more later)
Node Radius = This is the specified area the node covers you can see an example of radius in the pic below, the default value is 70 (well cover this in section VI)
Node Connections = This displays which nodes connect to the node you're next to, this helps in troubleshooting incorrect paths between nodes.
Creating Nodes
The beginning of waypointing a map is laying your first node and then laying all additional nodes and actions after that. To lay a node stand right where you want the node to be, open the console and enter /node_add then press enter, it will now place a node in the map exactly where you were standing. This node is given a unique number and has default settings. Below is what a placed node with default values looks like in game.

Remember, there cannot be more than 1024 (node numbers go from 0-1023) nodes per map. Also try not to put nodes to close together because it eats up memory, but also remember to not space your nodes no more than 3.5 seconds apart. If they are placed further apart the bots will just keep timing out and cause lots of lag. Try not to place nodes in spawn areas unless needed.
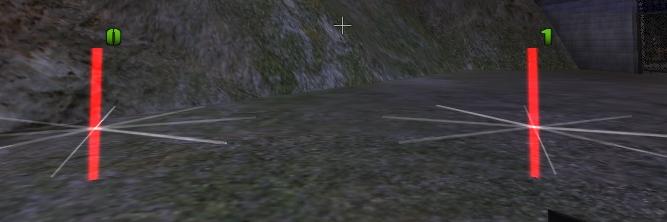
Now it's time to place another node near your first node, so walk to the next location you want to lay your next node, remember to keep the above notes in mind when placing additional nodes. After you've placed your second node it should look something like this.
Creating a Path between Two Nodes
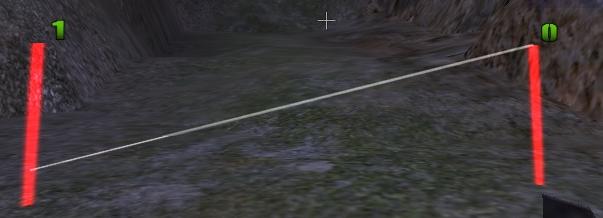
Okay, now that we got two nodes placed, let's add a path for the bots to travel from one node to the next. Using the example above, open the console and type /node_connect 0 1 then press enter. This will create a one-way path from node 0 to node 1 like the following picture shows.
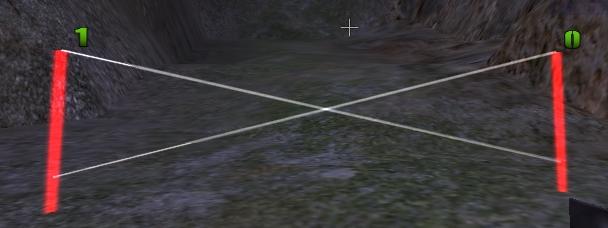
Now if we wanted to keep it like this, when playing the bots will only travel from node 0 to node 1 in one direction only, they will not go back and forth between the two nodes. In order for them to go back and forth between two nodes, we must create a path from node 1 to 0, this is then called a two-way path. To do this type /node_connect 1 0 in the console then press enter. This will then create a path from node 1 to node 0 and seeing that we made a path from node 0 to 1, the bots can now go back and forth between the two nodes. Below is an example of what a two-way path looks like.
And that's how you create a path between two nodes. You must connect all paths you plan on using. No single node can be connected to more than 4 other nodes at the moment. Make sure not to create a path between two nodes that are really far apart. Use two-way paths on nodes that the bots will traverse a lot or places they need to go to and from a certain location. Also try to keep paths as natural and human like as possible, you're trying to mimic humans with bots so makes sure to try and do that with you're waypoints as well. Try not to use one-way paths much or at all, unless a specific area requires them. The reason is because the bots sometimes have troubles calculating their pathfinding and sometimes even skip by objectives. Always keep in mind that Fritzbot has a very high intelligence in path navigation and the bots won't traverse the wrong way down nodes into areas that don't have any goals for them.
Also try to keep you're paths as fluid as possible, especially when they need to turn. Like say you got a 4 way intersection on a certain pat of a map, try and make a diamond like path network instead of a simple cross. Doing this will help bots make turns more fluidly and keep them more alert.
Moving Nodes
If you placed a node in the wrong place there is the ability to move it. Lets say you placed node 0 in a wrong location or you wanted to move it, MAKE SURE it's disconnected from any other paths (we'll get into that in a little bit) then go stand in the location you want to move the node to, open the console and enter /node_move 1 and press enter. The node will now be moved right where you were standing.
Deleting Nodes
It is not possible at present time to delete single nodes, the best thing you could do is move the node to a discrete location and make it unavailable. To do this, make sure the node is not connected to another node and move it to whatever location you want to "hide" it away using the method for moving nodes. After that you must change the team setting. Let's say you wanted to get rid of node 1 and you just moved it to a location you want it tucked away at. After that open the console and enter /node_team 1 -1 and press enter, this will make node 1 unavailable to every bot, axis or allies. The internal code and bots will now ignore this node. This does not use up resources doing this method and it's the only thing you can do to get rid of single nodes.
My suggestion is try to use the node you plan on deleting either the moment you want to delete it or later on down the road. Try not to create a massive amount of nodes you don't plan on using, just use caution when placing nodes, so you don't place too many unused nodes.
Now let's say you wanted to delete EVERY single node on the map. Naturally you could do this by deleting the .nav file for the map, but what if you wanted to keep the actions. Well to clear a map of every single node open the console and enter /node_clear then press enter. Every node should now be deleted on the map. BE CAREFUL using this command, you could accidentally delete all your work especially if you didn't make backup copies regularly.
Disconnecting Node Paths
Okay now mentioned previously let's say we created a two-way path between nodes 0 and 1. But let's say you changed your mind later on, decided to make one of the node unavailable or decided to move one of those nodes to a different location, well you have to disconnect the path correct? Why yes, so here's how you do it.
Now let's say you wanted to delete the path going from node 1 to node 0. Open the console and enter /node_disconnect 1 0 and then press enter, and voila, path deleted. Simple huh? Yeah, this is WAY better than the old method of deleting paths.
Node Info
Most of the info you'll need is displayed in the handy node HUD mentioned before but let's say you wanted to find out node info for a node you're not next to, this is how you do it. Let's say you want to find out the info for node 1 open the console and enter /g_node_info 1 and press enter, you should see something like below display in the console.
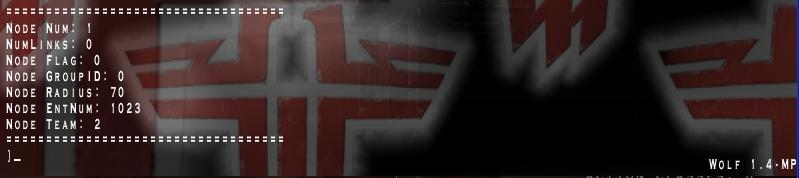
It's the same exact info you see in the in-game HUD mentioned above. This is useful for finding info for a node either tucked away or that's not near your present location and/or to make sure a nodes got proper settings. You however won't get node connection info as you would using the HUD above.
Node Draw Distance
Now we can see out nodes on the map, and actions and paths but the thing is (and you'll notice this) it can create some lag graphic wise. I mean it makes sense your video card has to draw all those nodes, actions and paths plus draw the map your on and everything going on around you it can take a toll on your video performance and in a case where there's alot of nodes, actions and paths laying around, it can make your game unplayable almost.
Thankfully, there's a way to adjust the draw distance for the nodes. The default value for this 512, but if you wanted to change it, here's how. Let's say you wanted to change the draw distance to say 768 for waypointing, open the console and enter /node_drawDist 768 and hit enter, it'll now increase your draw distance and you can see more nodes further away. You could also lower you're draw distance as well, the values go from 0-1024, don't go any higher than 1024 though! Personally I recommend a setting of 256, it works well for me and doesn't create too much lag, but this setting is based more on personal preference and what you're PC is capable of handling.
Saving Waypoints
Now you should save your work often, that's always a great rule to follow because you never know what will happen such as computer crashes, game crashes, pr0n pop-up's locking up you're PC, you know anything really. To save your progress at anytime while you're creating your waypoints bring down the console and type /node_save then hit enter. This will save your node file exactly as it was when you hit enter. This is then stored in a .nav file (using the same name as the map name) in the \Program Files\Return to Castle Wolfenstein\fritzbot\bots\maps directory. Keep in mind the .nav file MUST be named the same name as the map (i.e. if it's a waypoint file for Castle, then it must be named mp_castle.nav) also DO NOT try to use a specific maps .nav file on a different map version and/or opposite gametype than the waypoint file was created for because it just doesn't work properly (I've tried it).
Be careful though, if you made a test edit or removed all your nodes by accident and don't want to save for some reason, use caution when saving. It's also good practice to keep backups regularly just in case. Taking the time to protect your data can save you lots of headaches in the future.
Alright, now that we've covered the easy stuff, let's move onto the more complex stuff. Actually it isn't too hard but can be tricky.
Console Command Quick Lookup
/node_add = Adds a node at the location you are standing at.
/node_connect = creates a path between two nodes.
(ex. /node_connect 0 1 creates a one-way path from node 0 to node 1, entering /node_connect 1 0 right after creates a two way path between node 0 and 1.)
/node_move <node #> = Moves the location of the given node (ex. /node_move 1 moves node 1 to the location your are standing at)
/node_team <node #> -1 = Makes the given node unavailable to every bot no matter which team, we'll get into this command more later (ex. /node_team 1 -1 makes node 1 unavailable to each team)
/node_clear = Deletes every single node on the map. (Use with caution)
/g_node_info <node #> = Displays information on the given node in the console. (ex. /g_node_info 1 displays node 1's properties in the console)
/node_drawDist <0-1024> = Sets the draw distance for your nodes, actions and paths (ex. /node_drawDist 256 sets your waypointing draw distance to 256)
/node_disconnect = Deletes the path between the two given nodes. (ex. /node_disconnect 1 0 deletes the path leading from node 1 to node 0)
/node_save = Saves all the nodes, actions and other waypoint related settings for the given map.
Section III - Advanced Waypointing