
Section III - Advanced Waypointing
Node Radius
Well, now we're getting into the tough stuff. First things first we will go into node radius, the reason we're doing this first is because to do some of the other stuff in this section, we'll need to alter radiuses to get them working properly.
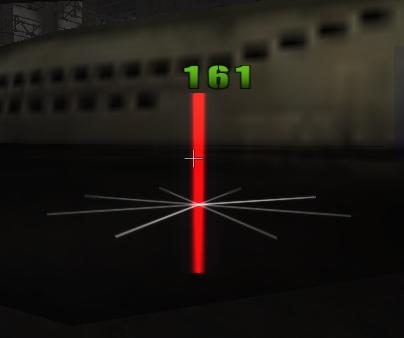
Now let's explain what a node radius is. Let's say you place a node, like in the picture below.
Now by default you won't see those lines at the bottom of the node, you must open the console and type /node_drawradius 1 then press enter. Now you'll notice that all you're paths will disappear and all nodes and actions will look like that in the above picture. This doesn't mean you're paths we're deleted, there hidden while the radius view is active. To deactivate the radius view, re-enter the command above in the console, but this time use a value of 0 instead of 1. It's a good idea to keep this option on when altering radiuses, as you can see changed radiuses in real-time.
Okay, now let's explain. Bots travel from node to node, there goal is to reach reach the next node. This is part of their navigation system. The Radius is the logical space the node takes up. If a bot is within the nodes radius, it's considered to have reached the node that radius is connected to. Those lines you see in the above picture is the actual space on the map that particular node takes up. This range can be altered, and we're going to get into that in a moment.
Why is radius used you say. Well Radius is used to help the bots navigate and prevent possible hang ups the bots may have in the map at various locations. In bigger areas you could use a large node radius, but in small hallways it's better practice to make the radius smaller. So in short, the larger the radius the more freedom the bots have reaching a particular node (they don't necessarily have to be on the exact path) and a smaller radius makes the bots play a lot tighter and makes to where they have to reach the area you designated the node for.
This is one of the trickiest things to get the hang of when creating Fritzbot waypoints, but you must learn it. Now by default the radius of a node is 70, but let's say you wanted to alter the radius of node 1 shown above to 50, open the console and enter the command /node_radius 1 50 and then hit enter. If you have the radius view on, you should see the radius around the node shrink. You should also see the node radius number for that node at 50 instead of 70. You can shrink or enlarge radiuses as you wish. It's recommended you don't go any lower than a radius of 10 and try not to set too high of radiuses either. The values I use the most are 15, 20, 25, 30, 35, 45, 50 & 70. Each one of those seem to work for various situations. The possibilities are endless, so you'll have to try different values until you reach the right one for the node you're altering.
It's good practice to alter you're nodes as you need to. Remember the nodes radius MUST fit the area it's designated for. Editing the radiuses is a very tricky process, but it can be a very powerful navigation tool and can be a bit frustrating at the same time, if you're bots are having problems navigating the map chances are it's because of a radius that needs to be altered. Also even though you're altering a node's radius, you still HAVE to follow the 3.5 second rule mentioned earlier in this guide. Try to keep you're node radius away from hugging walls and/or where they are poking through the walls as you may have troubles like bots running up against walls trying to reach a node that has a radius poking through a wall and so on. Also try to keep from intersecting the radiuses between two nodes as the bots may get confused at to which node there near.
Throughout this section we'll talk more about radiuses, as well as the next two sections of this guide. It's a bit tough at first, but with some practice and good observation you'll get better at it. I just hope i explained it well enough.
Changing the Default Radius
The default node radius is 70, but what if you wanted to make it smaller or larger, and change it to various radiuses at given intervals while waypointing. Let's say you wanted the default node radius to be 50 instead of 70, here's how you can change it. Open the console and enter /node_deafultradius 50 and press enter. Now every node you insert into the map should have a radius of 50 by default. Using this command can help you in certain locations that require a smaller radius than 70, and in the end it can save you time when you go back and update radiuses.
Environmental Waypointing
Now this may be bad terminology on my part, but by environmental I mean things like buttons, doors, crawl spaces, obstacles, ladders and other stuff. Now by default Fritzbot has enhanced environmental code that allows the bots to open doors, activate buttons, crawl, jump and climb where ever needed and no special condition needs to be applied. But there is some tricks to get them working properly. These mainly have to do with setting nodes up correctly and setting radiuses properly. Keep in mind the 3.5 second rule applies to the stuff below as well.
Now for crawl spaces, it's pretty easy just make sure the nodes that are in the crawl space have radiuses that fit the area of the crawl space.
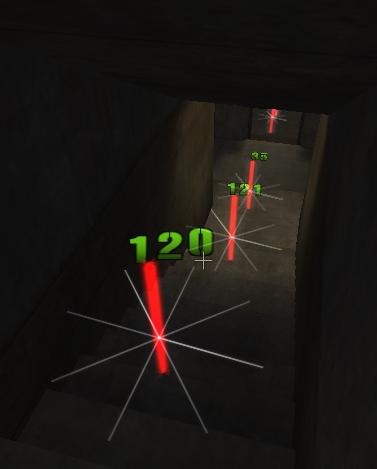
Obstacles use normal paths as well, they should fit the obstacle there on and the last/first node of the obstacle should have a wider radius. Take a look at the picture below for an example.
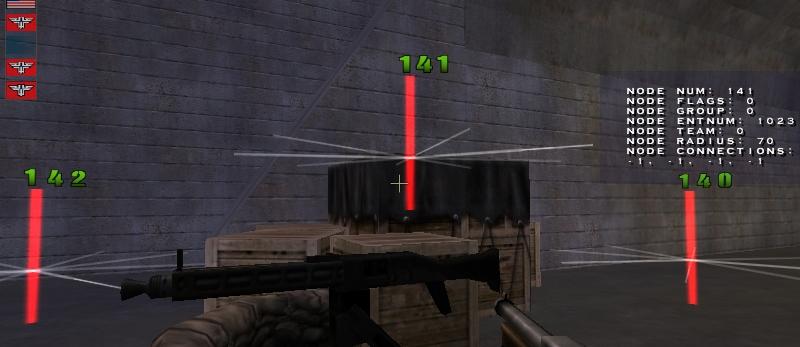
Now nodes 142 and 140 in the picture above should have a larger radius than node 141. In fact, radiuses of 45, 50 or 70 would work for 142 and 140 and a radius of either 25 or 35 for node 141 would work. The node on the obstacle itself has to fit the size of the obstacle. The other two can be any radius really but seeing as bots are going to be flying off the obstacle, a wider radius on the ground would be best, otherwise they'll hit the ground and run back to the node they we're aiming for falling from the obstacle. The same goes for curbs or platforms and things like that.
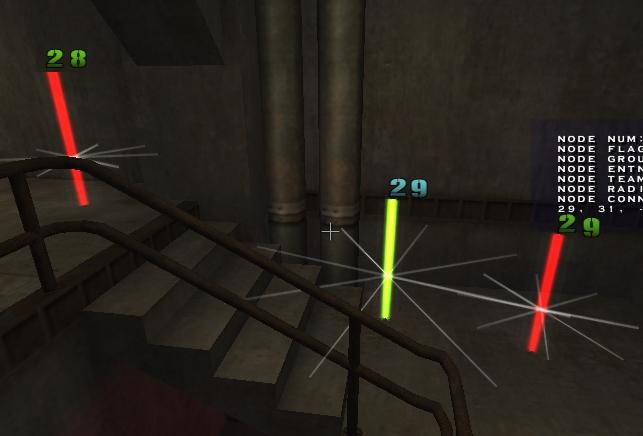
Now onto doors, these can be kind of tricky because one wrong radius value and you'll see bots running against the wall a lot instead of going through the door or doorway. There's a trick to getting them better at going through doors and doorways but it takes an extra node and it will eat up a little memory because 3 nodes have to be places pretty close to each other. Now to path a door place a node just before one side of the door and one on the other side of the door. Now place another node right in the middle of the doorway. It should look something like this.
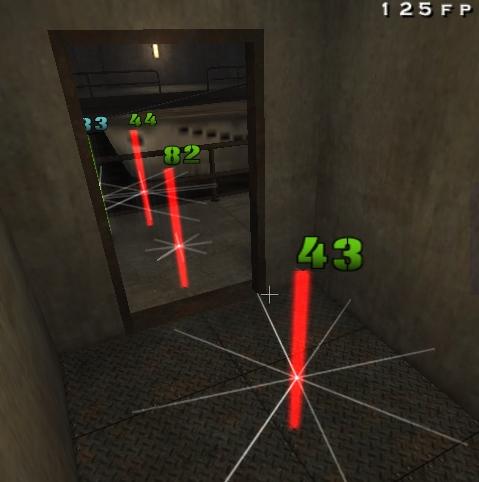
In the picture above you'll see that both nodes 44 and 43 are on the opposite sides of the door. You'll also notice their radius is smaller than 70, this should be like that. In fact the nodes on the opposite sides of a door or doorway should be around 25, 35 or 45 radius depending on the actual size of the doorway, and the node in the middle should fit the actual width of the doorway. In the case above node 82's radius is 15 and it fits the doorway perfectly. This really helps the bots navigate through the doorways and doors better. It may seem kind of tricky at first, but it's really not. These methods work well for entrances into small hallways from big areas too.
Now onto ledges, these are pretty easy to do but placing the nodes right can be tricky. Take a look at the photo below.
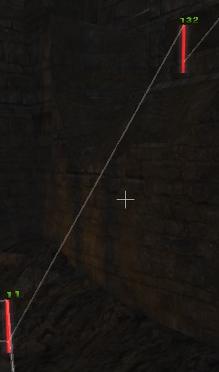
Okay, notice node 132 is on the ledge itself and node 11 is at the bottom of the ledge. Okay node 132 doesn't need anything special really set for it, some will say to set the jump flag for it but the jump flag isn't very good in my opinion it's buggy and doesn't seem to do much that having it unset wouldn't do so i would try not using that at all. Node 11 should have a fairly large radius, remember the bots are falling down a ledge and won't exactly land right directly center in the node all the time. Next create a one-way path from the node on top of the ledge to the node at the bottom. Make sure to make it one-way otherwise you'll see bots running up against walls trying to go to the node on the ledge.
This stuff gets more easy as you go. Some times pathing around environmental objects is a lot easier than pathing them, but that kind of depends on the map and/or actual environment.
Setting Team Specific Nodes
Earlier we learned how to make nodes unavailable to both teams, now we are going to learn how to set nodes to where only certain teams can use them.
Now by default any node placed on the map is set to Team number 0, this info can be seen on the node HUD mentioned in the previous section, or by looking at node info in the console. A team value of 0 means any team can use that node. Now let's say we placed node 1 in the map but we wanted to set it to where only the allies can access that node, open the console and enter /node_team 1 2 then press enter, you should now see the team number as 2 for that node in game. A value of 2 means the node can only be accessed by the allies, a value of 1 means only axis can access the given node and as mentioned earlier in this tutorial a -1 value means the node is unavailable to either team.
This is very helpful in sealing off certain parts of a map from one team while still making it available to the other team. This works well for spawn areas and/or places that lead to team specific actions. It's also a very handy tool in making maps run more fluidly for a particular team and/or keeps them away from places they just don't need to be at all. It can also be used in conjunction with grouping nodes and making them available at certain times in the match, but we'll get into that more later. But on the same note, be careful. Because of the bots combat behavior if they so happen to end up in a place with nodes that only the opposing team can access they will be stuck until killed, as you can guess this isn't a good thing, so just use the node team settings with caution.
Node Flags
These really aren't used much for Fritzbot waypointing, basically there to alert the bots that at the given node they have to do something or be on alert. By Default any node placed on a map has a default flag value of 0, this can be seen on the in-game HUD for the nodes or when you view node info in the console. Okay let's say you wanted to make node 1 a jump flag (we'll talk about this in a bit) open the console and enter /node_flag 1 16 then press enter. You should see the flag value for node 1 at 16 now. Below is a list of what flag values can be used and what each represents, there's not a whole lot of them at the moment.
Node Flag Values
0 = Indicates that the node is just you're normal everday, run of the mill node.
1 = Indicates to the bots that the given node is at the top of a ladder (we'll talk more about this in a little bit)
2 = Indicated to the bots that the given node is at the bottom of a ladder (we'll talk more about this in a little bit)
4 = Indicates that the given node is near a Spawn or Checkpoint flag (we'll get into this more in a bit)
16 = Indicates that a dangerous jump is up ahead and instructs the bots to use caution so they don't risk their health stupidly. This is used for places the bots need to jump from high places down to lower places (such as the top of bunkers) set these on the node that on the top of whatever the bots must jump from. Do not use this flag too much (if at all) as the bots are kind of flaky with it.
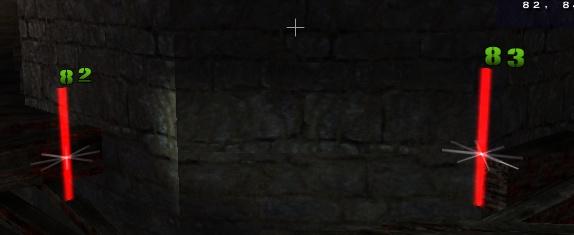
32 = Indicates that a gap is nearby and the bots must leap over the gap to the other side. This value must be used on both nodes across a gap like in the example below, both nodes 82 and 83 are on each side of the gap and each have the leap flag set.
As you can see, node flags aren't used much and are usually only used for special purposes. Be careful not to set a wrong node flag. Fritzbot won't catch erroneous flag values and if the bots reach a node with an incorrect flag value you'll have some problems.
Grouping Together Nodes
Okay you may have noticed in the previous section that nodes can be set in groups. This just groups together nodes to be turned on or off in the script (which we'll get into more later) and should be used in conjunction with setting team specific nodes. Like say you wanted the allies to only access nodes 5-27 until an objective is complete, you would then set them to allied only nodes and give them a group number (such as 1), you can have many groups of nodes but it's best not to have too many. By default all nodes entered into a map have a group number of 0 which can be seen on the in-game node HUD or by looking at node info through the console.
Now let's say you set nodes 0-17 to group number 1 and you placed node 18 which you also want to be part of group number 1, open the console and enter /node_group 18 1 then press enter. The group number for node 18 should now be set to 1 and there you go.
We'll get into how to group numbers more in the scripting section. As said before try not to put too much node groups in a map unless it's needed and/or it makes the map play better. This is good for blocking certain teams or all teams from accessing certain parts of the map until an objective has been completed. Keep in mind that you can't shut off node groups at the moment, you can only activate them. Also keep in mind that most of the time the bots won't travel down nodes if there isn't an action that's part of the current goal ID located there (we'll get into that more in the objective section). And one more thing node groups don't go by the goal tracker as action groups do so try not to think of it like that. Also make sure you set you're group numbers and nodes properly.
Spawn/Checkpoint Nodes
Now Spawn and Checkpoint flags have actions that let the bots know that it's a flag which we'll get into in the objectives section, but you also need a node set against the flag to instruct the bots to move there to take the flag. Now to do this you must lay a node right up against the flag like so.
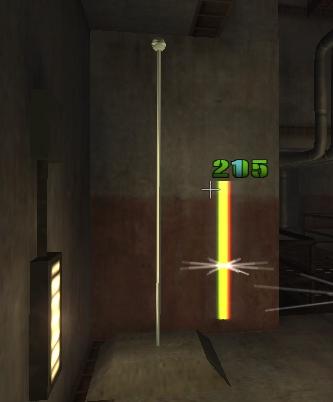
You'll see the node there like above (I know the action is in the way in the pic, but it's node 205) Now we got to change some of the properties for the node so the bots know it links to a flag. To do this, let's say we wanted to make node 205 shown in the picture above a flag node. First change the radius of that node to 25, then change the node's flag value to 4. Now after that we must find the entity number of the flag because we need to link the node to the flag, you'll see that by default all nodes placed on a map are given ant entnum of 1023, this is displayed on the In-game node HUD or when you look at node info in the console. To change that number in this scenario, stand a few steps away from the flag and aim at it, then open the console and enter /viewent and press enter, you should see something like this.

Now you may not see this exactly so if you don't, keep taking steps toward or away from the flag and keep entering the viewent command until you see results like above. Okay, now it should say Classname: Team_WOLF_checkpoint and you see the EntNum: 575. That's the entity number. So after you got that enter the following command /node_ent 205 575 and press enter, the entnum for node 205 should change to 575.
Alternatively you can places several nodes around the flag and have each or there radiuses reach the flag. This actually helps a lot on CP maps, but any node that crosses over the flag must have it's node flag set like above and it must have the flag's entity number and other settings mentioned above. Sometimes it can't be done though, so in some maps the other option is the only way, but this method is worth mentioning. Also only nodes that are part of checkpoint or spawn flags need to have their entity number set, you don't have to set entity numbers for nodes near dynamite objectives.
We'll continue this example in the objectives section of this tutorial when we learn about Flag Actions.
Ladders
Ladders can be kind of tough to get right but with enough practice it can be done. First we'll dive into how to do basic small ladders or mid-sized ladders, this applies to anything you want the bots to climb that functions like a ladder, this could be a climable rope, or a tree, and so on. Below is a picture of a small ladder with two waypoints placed...
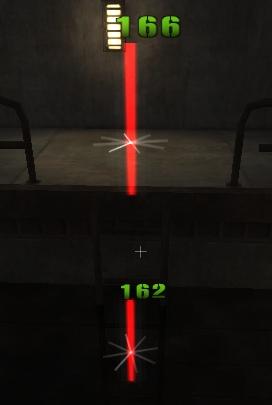
Now node 162 should be placed right at the very bottom of the ladder. It should have a radius around 35 and it NEEDS to have the node flag value set to 2 which is defined in the node flag section above (which indicates it's the bottom node of a ladder). The ladder at the top of the ladder needs to be placed the second you dismount from the ladder. The best method is to keep lightly press the up key until the second you see you're player disconnect from the ladder, then place you're node. This top node needs to have a radius of around 25 or so. It does not need the top ladder flag, being this is a small ladder it doesn't really madder if the bots go down the ladder by jumping down because they won't lose any health.
Now onto the long ladders, these are ladders that need to be setup properly because the bots could take massive damage and/or be killed not using the ladder correctly. Let's start at the top part of the ladder shown in the picture below...
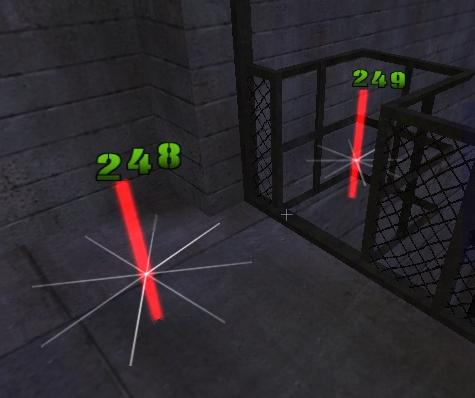
Now node 249 is the top node on this ladder, you do the same methods described for small ladders to place the actual node and radius, after that you'll want to set the node flag value of 249 to 1 (which indicates it's at the top of the ladder) Notice node 248? this is what i like to call a starting node, whenever a bot sees a node has a top ladder flag he will walk from the nearest node to that node at the top of the ladder. In this case when a bot reaches node 248 it'll walk from node 248 to node 249 and vice versa. This is so they don't go flying off the edge at full speed. The general rule of thumb is to place the node leading to the top part of a ladder close to the actual node at the top of the ladder.
Now onto the bottom part of the ladder. ALL of the previously mentioned methods for setting up bottom ladder nodes mentioned in the small ladder section above applies here but there is one extra step you can take. Now the nodes must follow the 3.5 second rule no matter what, but it usually takes awhile to climb long ladders. So to prevent this from happening you can move the bottom ladder node on large ladders up the ladder slightly like show in the picture below.
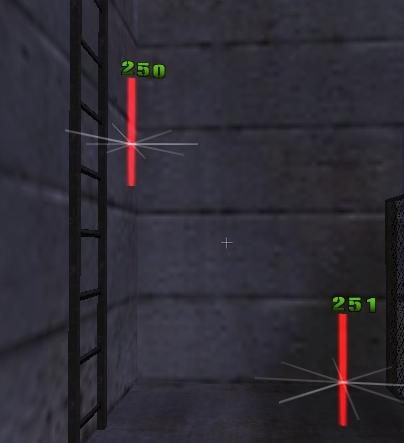
It still has all the properties set but the node is slightly elevated to help prevent bots from timing out taking to long to reach the next node. This can be kind of tricky because if you set the bottom ladder node to high up on the ladder the bots will hit the ladder and just start spinning. So you'll have to test the ladder and find out which works best for the given ladder.
And that's it, long ladders can be kind of tricky at first but it's really not. A thing to keep in mind ALL ladders must have the bottom nodes flag set to 2 in order for them to work properly, it doesn't matter if their small or large.
Underwater Pathing
Okay, Fritz works pretty good underwater (not 100% but good enough for government work), they'll fight properly underwater, go up for air during or out of combat and so on. Pathing underwater is pretty much the same as regular pathing but you got to take some considerations into effect first off.
First become a spectator, that way you can go in the water and you don't have to worry about drowning. Now move until you're right on top of the waterline (DO NOT go to high up, otherwise the bots can't reach the node) once you're right on top of the water, place a node like so.
It's kind of hard too see, but ALL nodes you place in water should be at the top of the water line (unless you want them to go underwater to swim under an obstacle or whatever). This encourages bots to swim on top of the water and are less likely to run out of air. If they'll do it or not is a totally different thing. Don't pout nodes underwater unless it's necessary, also try not placing too many nodes in the water you goal is try and get them out of the water as quick as possible. No additional flags or properties need to be set to path underwater. Just make sure you're nodes radiuses aren't intersecting with objects in the water. Also one more thing to note is that bots will only go up for air if the given nodes have an accessible waterline, in areas such as tunnels where they can't access the top of the water they can drown.
Pathing Hills & Stairs
Pathing hills and stairs are about the same as pathing regular areas so I'm not going to go into that in full detail but i will mention a few pointers you could use to make pathng hills and stairs more fluidly so the bots have less trouble with them. Let's start off with hills, take a look at the hill pictured below.
Notice how they lead up the hill on climbable slopes. This is how hills should be pathed. Nothing really special to mention about that, no additional settings need to be set. A few notes though, first only place nodes on hillside that can be climbed by bots and humans, if you must path hillside that can only be traversed one way then make a one-way path between the two nodes. Secondly make sure the radius of the nodes fit the hillside and make the radius of the node at the bottom of the hill have a larger radius.
Next we move onto stairs, some can be easy other's can be kind of tricky. There's three main types of stairs (there may be some rare others as well) Straight, L-Shaped and Spiral.
Onto Straight stairs take a look at the picture of the straight stairs below.
Now you should always have a top and bottom node on a pair of stairs. Optionally you could have a node in the middle just in case. The radiuses of all stair nodes should fit the set of stairs they are a part of, there shouldn't be any overhanging radiuses as the bots may get thrown off by them. The bottom node again should have a larger radius otherwise the bots will reach the bottom of the stairs and may have to backtrack to officially reach the bottom stair node. Also additional flag or entity settings need to be set, just the radius.
Now onto L-Shaped stairs. Take a look at the picture below.
Same methods apply to these stairs as with straight stairs but the nodes can be placed more fluidly with L-shaped stairs. Also L-shaped stairs usually have a platform in the middle of them that should have a node on.
Next comes the trickiest stairs to path, spiral stairs. Take a look at the picture below to find out what a spiral stair case looks like.
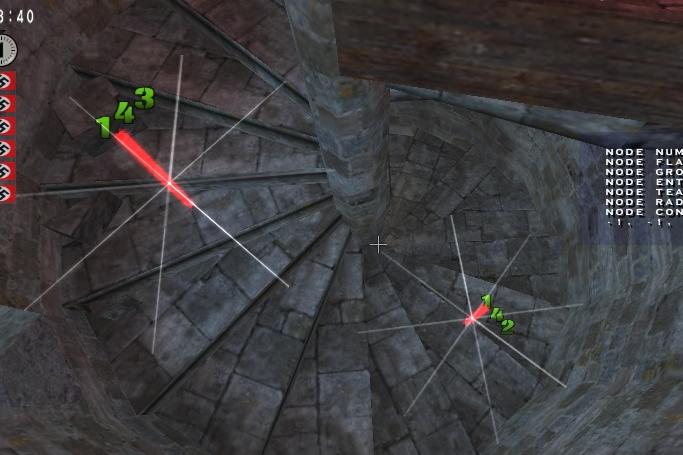
Okay, now if you look close enough you'll see that nodes 143 and 142 are almost perfectly lined up with each other. This is how you should set up the nodes on spiral stairs like this. Now you must give them a radius of 25 or 35 to have them effective, making them to large will cause clogs and having them too small and the bots will crouch at each waypoint and could block the staircase doing so. For a good example of how spiral stairs should be pathed take a look at either mp_tram or mp_keep as they have great spiral stair path layouts.
Miscellaneous Stuff
This category is for mentioning some things I either forgot to include above, don't fit in any of the above categories, or things you currently cannot waypoint.
One thing you cannot currently waypoint is Script Movers. These include Trams, Elevators, Moving Platforms anything that moves in the map on it's own or by activation cannot be pathed at present time, so it's best to just path around those. Now some maps are built around script movers, but that does not mean they can't have a waypoint created for it, I mean look at Tram, I just pathed around the trams. Some maps however cannot be pathed because of this but there very limited, in fact I don't know of any with script movers that are just unwaypointable.
Another thing that cannot be waypointed is blocked paths. These are things like wood barriers that require grenades to blow up the obstacle. It's best to path around these if you can until the bots have the ability to destroy barriers with grenades.
And that does it for nodes, next we move onto actions which also are the backbone for fritzbot waypoints, it's kind of a lengthy section but the information is vital to properly waypointing a map. I hope all the stuff mentioned so far is fairly easy to understand.
Console Command Quick Lookup
/node_drawradius 1 = Displays the radius on screen of nodes and actions for the given map (a value of 0 turns this off, a value of 1 turns this on)
/node_radius <node#> <Radius#> = Sets the given nodes radius to the value given (ex. entering /node_radius 1 50 will give node 1 a radius of 50)
/node_defautlradius <Radius#> = Adjusts the default radius value for any node you place in the map afterwards (ex. entering /node_defaultradius 50 will now make each node placed on the map have a radius of 50)
/node_team <node#> <Team#> = Sets which team can access the given node, a value of 0 means that any team can acces the node, a value of 1 means only axis can access the node, a value of 2 means that only allies can access the node and a value of -1 means neither team can access the node (ex. entering /node_team 1 2 makes node 1 accessible only by the allies)
/node_flag <node#> <flag#> = Will give the given node a special flag that alerts the bots of a special condition at the particular node. (ex. entering /node_flag 1 4 will tell the bots that a spawn or checkpoint flag is near node 1, a value of 0 indicates it's a regular node, a value of 16 indicates that it leads to a dangerous jump, and a value of 32 indicates a gap is ahead and the bots must leap across it, a value of 1 indicates it's the top node on a ladder, and a value of 2 indicates it's the bottom node on a ladder.)
/node_group <node#> <group#> = Groups together nodes so they can be turned on in the scripting system. (ex. /node_group 3 1 makes node 3 part of node group 1)
/viewent = Is used to view the entity properties of map objectives and other entities in the map (such as MG42's), there is no additional values that need to be entered with theis command.
/node_ent <node#> <entity#> = Sets the given nodes entity number to the value given to alert the bots an objective is nearby, for nodes it's only used for checkpoint and/or spawn flags, use in conjunction with the viewent command. (ex. Entering /node_ent 1 543 sets node 1's entity number to 543 which means it's near entity 543 in the map)