Section VI - The FritzScript System
Basic Info
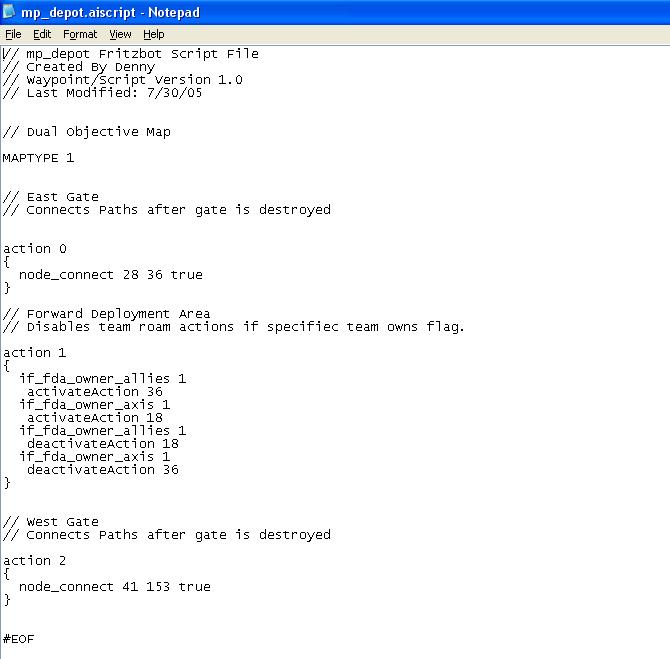
The FritzScript system is much like a map script system except it deals strictly with waypoints. It's a very powerful tool in that you can activate/deactivate actions and nodes from within the script and provide a lot of flexibility in you're created waypoints. It looks programming like, but it's really straight forward. Below is a picture of a FritzScript file.
Now FritzScript files have the .aiscript extension and are located in the \Program Files\Return to Castle Wolfenstein\fritzbot\bots\scripts directory they are created using Notepad (a text program that comes with Windows) Each waypoint HAS to have a FritzScript file, even if there is no action tests or keywords. In the picture above the forward slashes indicate to Fritz to ignore the given line, this is good for putting notes in your aiscript file and credits and such.
The script file contains variables for given situations, there not console commands but scripting variables that changes the status of specified nodes and actions after an action changes it's status.
Notice above we have action 1, action 2, etc? These are called action tests, the indicated actions are objective actions and in between the {} is the keywords, these tell fritz to perform the given keyword once the status of the given objective action is changed. You need to have an action test in order to have keywords in the script otherwise they won't work and you may get an error. These keywords MUST be placed inside the brackets. For safety sake we'll just say these are case sensitive. You can only have 64 action tests in you script file, and a max of 128 keywords, don't get FritzScript file confused with map script files because they are different. The console will give you an error message when you load the map if there's an incorrect entry in you're script. Now we'll get into more of what you can do with the script next.
Required Variables
Take a look at the script shown above. There are 2 variables in every script that MUST be in there, if you don't want any action tests or keywords, you still must include the following 2 variables. An aiscript file must always have the MAPTYPE variable set at the top of the script and the #EOF variable set at the bottom of the script. For the map type variable it can either be a 1 if you're map is a dual objective map, a 0 if it's a regular objective map, or a 2 for a checkpoint map. These commands are REQUIRED, so you must define them, remember each waypoint must have a fritzscript file, these two variables are the minimum requirement for that file.
Node Connecting/Disconnecting
For dynamite objectives such as gates or doors or walls you must not set a path between the door, wall or gate until it's destroyed. Well using the script you can do that. Using the node connect command you can create a path between the two nodes on each side of the door. Alternatively you could disconnect nodes as well after an objective action has been destroyed.
Now let's say action 5 is for a storage door and nodes 151 and 152 are on each side of the door. Don't create a path between the two otherwise the bots will have problems, instead set it up in the script to where the path is created after the storage door is destroyed.
To do this, you would enter the following in the script...
action 5
{
node_connect 151 152 true
}
This will create a two way path between nodes 151 and 152 after action 5 is completed. The true statement indicates that you do want to create a two way path, a statement of false means you only want a one way path created. The same above method works for disconnecting nodes but you would use "node_disconnect" instead of "node_connect"
Sometime you may need 2 node_connect keywords especially if you place nodes in between doors. You can place as many as you need but try not having too much. Also keep in mind the nodes involved in the node_connect must have an available node link so a path can be created otherwise you'll get an error.
Scripting Node Groups
Previously in the advanced waypointing section we talked about node groups and how they can be set and how they can be made available to certain teams upon completion of an objective using the script. We're going to continue using the previous example but we're going to also set action 5 up to make node group 1 available to the allies after action 5 has been completed. To do this we would setup the script like so...
action 5
{
node_connect 151 152 true
openNodeGrpToTeam 1 ALLIES
}
As you can see each keyword is on a separate line and in addition to connecting nodes 151 and 152 completing action 5 it will also open Node Group 1 to the allies. This is good for cutting off groups of nodes from a specific team until a certain objective is completed. If you wanted to make a node group of allied node available to the axis you would use the variable "AXIS" instead of "ALLIES" in the above keyword. These are rarely used actually as a lot of maps have no real use for them, but that doesn't mean that they can't be used at all it just all depends really.
Soldier Weapon Switching
Let's say that after and objective you want the soldier bots to switch their current weapons to more close quarters weapons instead of long range weapons, then the below is how you would go about doing it. You can use many variables so we'll go through an example, then list the possible variables.
Now still continuing the above example let's say that after action 5 is completed you want the allied soldiers to switch to a random close quarters weapon except the flamethrower & panzer and you want the axis soldiers to switch to mp40's. Here's how the script would look...
action 5
{
node_connect 151 152 true
openNodeGrpToTeam 1 ALLIES
bot_switchToWeap random allies
bot_switchToWeap smg axis
}
So in addition to the already previously mentioned script commands after action 5 is completed the soldiers for both teams will now switch to the weapons defined in the script. There are many different variables for this command so we'll go through which you can use, enter the optional variables exactly how their shown below. The command is setup like the following...
bot_switchToWeap <weapontype> <team>
Here are the possible variables for <weapontype> and what each does.
panzer = Soldiers switch to Panzer's Only
flame = Soldiers switch to Flamethrowers Only
sniper = Soldiers switch to Sniper Rifles Only
smg = Soldiers switch to either Thompson's (Allies) or MP40's (axis) Only
venom = Soldiers switch to Venom's Only
random = Soldiers switch to either smg's or venom's at random.
random_f = Soldiers switch to either the flamethrower, venom or smg at random
random_p = Soldiers switch to either the panzer, venom or smg at random
random_pf = Soldiers switch to any weapon at random except the Sniper Rifle
The possible <team> values are either "axis" or "allies"
And that's it, this can provide some variety in you're maps as well. Remember though this affects ALL soldiers for the specified team so they'll all switch to the specified weapon(s).
Changing Node Flags
Another thing you could do through the script is to reset node flags through the script, so say you wanted to removed the jump flag for node 65 after action 5 is complete you would add this to our example.
action 5
{
node_connect 151 152 true
openNodeGrpToTeam 1 ALLIES
bot_switchToWeap random allies
bot_switchToWeap smg axis
resetNodeFlag 65 0
}
This is rarely used, it could be useful for bridges that are destroyed you could set the normal nodes flags to leap flags after the bridge is destroyed if completing the objective creates a gap the bots must leap over.
Scripting Actions
The last thing is activating and deactivating actions using the script. What these variables do is they turn on or off actions within the map after completion of an objective. These can be used for ANY type of of action (objective or regular) although for actions to be activated the action's group number MUST be -1 unless it was previously deactivated and you want it activated again.
Now let's use our continuing example, let's say that after action 5 you want to deactivate actions 17, 25 and 44 and at the same time you want to activate actions 18, 26 and 45, you would enter those in the script like shown below...
action 5
{
node_connect 151 152 true
openNodeGrpToTeam 1 ALLIES
bot_switchToWeap random allies
bot_switchToWeap smg axis
resetNodeFlag 65 0
activateAction 18
activateAction 26
activateAction 45
deactivateAction 17
deactivateAction 25
deactivateAction 44
}
You can add as many activate or deactivate action keywords as you wish but remember that you got a 128 keyword limit for you're script. These can be really useful for turning off some actions during one objective and disabling them the next or vice versa, however most of the time you'll turn on/off actions using action group numbers instead. Also these also work on actions that are set to be active forever. Also another thing to keep in mind is that for alt_roam actions once they've been turned on you can't turn them off even through the script.
Conditional Scripting
The last scripting element we're going to look at is conditional keywords. These are used to activate/deactivate actions and other scripting events based on certain conditions of the specified objective action. There's currently six conditional statements and we'll go over which one's mean which. These are useful if you want to perform a scriping event based on the status of an action.
So let's say you want actions 13, 14 & 15 activated if the allies own the spawn flag (action 6) but have them deactivated if they don't. Here's how you would enter that in the script...
action 6
{
if_fda_owner_allies 6
activateAction 13
if_fda_owner_allies 6
activateAction 14
if_fda_owner_allies 6
activateAction 15
if_fda_owner_axis 6
deactivateAction 13
if_fda_owner_axis 6
deactivateAction 14
if_fda_owner_axis 6
deactivateAction 15
}
Notice the "if_fda_owner_allies" indicated that if the allies own the flag perform the given actions and the "if_fda_owner_axis" indicates that if the axis own the flag then the script performs the indicated action.
Now let's say you want actions 42, 43 & connect nodes 14 and 15 if the allies steal the documents (action 17), but have the actions deactivated and nodes 14 and 15 disconnected if the axis own the documents you would enter the following in the script.
action 15
{
if_obj_home_false 15
activateAction 42
if_obj_home_false 15
activateAction 43
if_obj_home_false 15
node_connect 14 15 true
if_obj_home_true 15
deactivateAction 42
if_obj_home_true 15
deactivateAction 43
if_obj_home_true 15
node_disconnect 14 15 true
}
Okay the "if_obj_home_true" means that if the docs or obelisk or whatever are not currently taken then the script performs the instructed action, "if_obj_home_false" indicates that if the docs are taken, then it performs the given actions.
And finally, let's say you want action 12 activated, node group 1 opened to the allies and node 17's node flag rest to 0 if the allies destroy the storage door (action 8) but if they haven't destroyed the door then all the above is not made available or changed. Let's say you also want actions 17 & 19 available if it isn't destroyed. Here's how you would script that.
action 8
{
if_action_true 8
activateAction 12
if_action_true 8
openNodeGrpToTeam 1 ALLIES
if_action_true 8
resetNodeFlag 17 0
if_action_false 8
deactivateAction 42
if_action_false 8
deactivateAction 43
}
The "if_action_true" indicates that if the objective is destroyed perform the given commands, the "if_action_false" indicates that if the objective isn't destroyed, then perform the instructed commands.
Notice how not one of the above conditionals has two commands and that each is separated? This HAS to be setup like this you can't daisy chain commands to a single conditional statement, you have to list separate conditionals for each item you want performed in the script. These can provide a lot of flexibility for you're map making certain things available at certain times and closing off others. Be careful though, conditionals although nice, shouldn't be used in excessive amounts. Take a look at the fritz officially released waypoints to get a good idea of how and what to script conditionally. Also this can get confusing if you plan on setting up a lot of actions to be turned on/off conditionally so be careful.
And that's it for the scripting system, by now you should have a complete understanding of all the fritzbot waypointing aspects and features. In the next section we're going to finish up our waypoint by setting up the additional support files and getting ready for release.
Section VII - Map Configuration Files & File Locations