
Section I - Intro To Waypointing
Basics Of Waypointing
For Those of you who don't know what waypointing is, it's creating a specific navigation path for a map to allow AI controlled bots to play on that particular map. Basically you take your favorite map and just build an entire bot path network so the bots will play the map smart, efficiently and near human like this same concept applies for Fritzbot's waypointing system. Now keep in mind while you can make the bots do alot, they can't do everything and are limited by how much features they entail in their navigation system.
Now waypoints in Fritzbot are made up of either Nodes, Actions & Routes. Nodes are normal points the bot must reach, each are interconnected and any map can have up to 1024 nodes at one time. Actions are like certain special well actions that let the bot know that once they reach the spot where the action is then do the instructed action (we'll get into that more in the actions sections) Routes are triggers that tell the bots that they must take a certain path to the routes linked action (which usually is an objective action) we'll cover this more in the route section
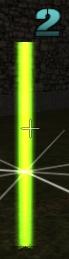
Nodes have a distinct look (see the picture below)
And Actions also have a distinct look (see the picture below)
Routes also have a distinct look as well (See the picture below)

Now Nodes will appear no matter what but actions must have a specific action set otherwise they remain invisible (we'll cover the available actions later on). Routes are visible but you can't view their properties until the route has been linked to a goal action.
That's all a waypoint file really is, it's just a series of carefully placed nodes, actions & routes with specific settings in tune with the map you're creating them for, nothing more really. Now keep in mind that Fritzbot is a single mod, and it only works with plain wolfenstein multiplayer, you cannot run say bani mod or shrub at the same time as Fritzbot.
Each map must have properly placed, connected and set nodes, actions & routes. They must also have Bot configuration files, server setting configuration files and a Fritzbot Script in order to properly run in Fritzbot (we'll cover all of these later on down the line in the tutorial). Also you cannot waypoint both Checkpoint and Objective versions of the same map at the same time. For example, you can only waypoint the objective version of mp_base or the checkpoint version of mp_base, but you can't do or have both.
Getting Started
Now before we get started, it isn't that bad of an idea to have some knowledge of the console. Fritz's waypointing system is mainly console based and you'll be using it alot. So for you console veterans this should be somewhat familiar but to you new folks it may seem a little daunting. So be sure to read everything very thoroughly.
Now first load up WolfMP.exe and run the Fritzbot mod from the mod menu inside WolfMP (or start it whatever way you usually do using a shortcut or whatever just make sure you're on the main menu). After Fritzbot has loaded you should see a slightly altered GUI to signify that Fritzbot loaded okay.
Now bring down the console using the tilde key (Which is the "~" key on your keyboard) and it should look something like this...
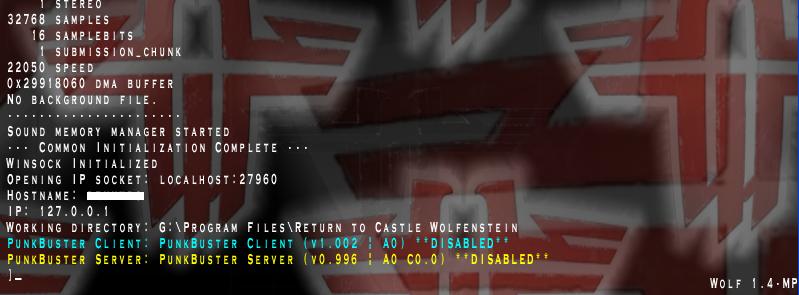
Nice huh? Yeah, she's a beauty. Anyways first off type /sv_pure 0 in the console and press enter. After that type /devmap <mapname> and press enter. For the <mapname> just replace it with whatever the name of your map is. Remember this HAS to be the name of the actual map, not the pk3. To find that out, associate PK3 files with your zipping program now explore the pk3 of the map you're trying to waypoint in WinZIP or whichever program you're using and go into the maps folder within that archive. The name of the actual map should say something like mp_base.bsp in this case the mp_base is the name of the map you'll need to enter with the devmap command in wolf to load the map.
After your done using the devmap command and pressed enter it'll load the map. After it loads pick whichever side you want or a spectator or whatever. Now you'll spawn on whichever side you chose and the warmup time will be running and you'll be the only one in the map. Now wait for the warmup time to expire and bring down the console again and set the timelimit to a higher value by enter this command /timelimit 6000 and press enter. it'll now set the timelimit higher so you won't be interrupted while waypointing (we'll get into what happens if time does run out in the notes section of this tutorial)
Okay, after that type the following command in the console /node_editor 1 and press enter, this will activate the node editor in Fritzbot. After that type /node_drawhud 1 in the console and press enter, you should see the node information hud activate and display on the right side of your screen. Next type /node_vis 1 in the console and press enter, this will enable the nodes to be visible when placed on the map. Finally enter /vid_restart in the console and press enter to refresh you're screen. After that close the console by pressing the tilde key again and you're ready to start waypointing.
After which the above entered commands should be written to your wolf config file (except vid_restart, devmap and timelimit) and you shouldn't have to enter then again (sometimes you may have to, but no big deal anyway) you'll still have to do a vid_refresh once you enter the map itself, just to make sure you're waypoint file loads and displays properly for editing only though, you should never have to do a vid_restart when playing with the bots and not editing nodes and such. By default if the node editor is turned on and then you load a map the .nav file for that map will automatically load. Make sure to turn off these settings when you play with the bots normally otherwise your video card won't like it very much, plus it's a pain. Only load bots with the node editor on if your troubleshooting a problem with your waypoints.
There's actually other editor related console commands that we'll get to throughout this guide, at the end of each section i will make a console command lookup list. It is imperative that you learn how to use the console and which commands do what in order to waypoint for Fritzbot. The console will alert you if your command was successfully carried out or if it wasn't.
Now that we covered loading and explaining the very basic Fritzbot waypointing features, let's move onto some actual waypointing.
Binding Console Commands
You can bind commonly used Fritzbot console commands to keys on you're keyboard if you wish. There is many tutorials available on how to bind console commands in wolf, a google search should help you out there.
Console Command Quick Lookup
/sv_pure 0 = Allows wolf to run modified DLL's and settings, needs to be set to 0 when running a mod such as Fritzbot.
/devmap <mapname> = Loads the specified map in wolfMP (ex. /devmap mp_base)
/timelimit 6000 = Sets the maps time limit to the time given in minutes
/node_editor 1 = Turns on Fritzbot's node editor, a value of 0 turns it off.
/node_drawhud 1 = Turns on the HUD for Fritzbot's nodes (not actions), a value of 0 turns off the HUD and a value of 2 turns on the in-game HUD for actions (we'll talk more about that later), and a value of 3 turns on the in game HUD for Routes (we'll talk about that more later as well)
/node_vis 1 = Enables the nodes/paths & actions to be visible when placed, a value of 1 displays everything, a value of 2 draws actions only, a value of 3 draws routes only, and a value of 4 draws only nodes & paths.
/vid_restart = Refreshes wolf's video display (needed sometimes to see your nodes)
Go to Section II - Basic Waypointing