Section V - Alternate Route System
Basic Info
Okay we've already covered Fritzbot Nodes and Actions but there is one more thing you can place in maps. These look like nodes but are white and they are called Route Nodes. These can be kind of tricky to grasp the concept of but aren't very hard after that and if used properly can provide even more flexibility in you're waypoint files. Routes are used in maps to instruct the bots that multiple path routes are available to complete an objective. So of course routes are linked to actual objective actions on the map and they use alt roam actions to indicate which paths the bots can take to the given objective. Route nodes are mandatory that means the bots will use them no matter what if there setup properly and they have available alt roam actions but the paths they take are random.
Only bots that can complete the specified action use route nodes. So engineers only use route nodes linked to dynamite objectives, and any bot uses route nodes to steal/escape with objectives. You however DO NOT use route nodes for spawn and checkpoint flags. You can have one or multiple route nodes per map and they need to be placed in spawn areas (only one per spawn is needed) and for the objective you want to link the route to must have multiple paths available to the objective, if an objective has only one way to the given objective action from the spawn location then a route node isn't required. I hope that made sense, route nodes also cannot be turned on/off in the script but alt roam actions can. We'll get into alt roam actions in a bit. You won't be using a lot of actual route nodes maybe 2, a few more for dual objective maps or maps that have lots of multiple paths for both/or a single teams like depot. And finally, you DO NOT have to setup a route system in you're waypoint, in fact a lot of maps may not need one or don't need one.
To get a good idea of how routes work on a map, you may want to take a look at an already waypointed map. A lot of the waypoints for the official RTCW maps released with the latest Fritzbot have route systems in place.
Route HUD
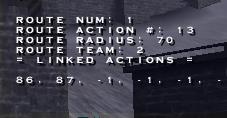
Routes (like nodes & action) also have an in-game HUD you can see when working with routes, this has information just like the other HUD's. To view the in-game route HUD open the console and enter /node_drawHUD 3 and hit enter. You'll now see the HUD change to something like shown in the picture below.
Now let's go through what each of the above settings indicate.
Route Num = This is the number of the route node you near, this is also shown on the top of the route node itself.
Route Action # = This is the number for the objective action the indicated route is linked to.
Route Radius = This is the radius (or area) the route node covers.
Route Team = This indicates which team can use the indicated route (0 means everyone can use it, 1 means only axis can use it and 2 indicates only allies can use it)
Linked Actions = These are the available alt roam actions that the indicated route can use, you can have up to 6.
Not much info or settings are needed for routes because there pretty straight forward and don't really require a lot of advanced settings. Throughout this section we'll go through the ins and outs of the Alternate Route System and hopefully explain it in good enough detail for you too understand.
Adding Routes
Well here we go again, lol. Adding routes are no different than adding actions or nodes really. Just stand at the location you want the route to be then open the console and enter the command /route_add then hit enter and presto, you got a new route. Now the thing with routes is they are visible after being placed, but you won't see any of the information for the route node you just added until you define an objective action you want the route node linked to. And finally you can only place 12 route nodes max on a single map at one time as I said before you shouldn't need even close to that much. Remember these are better placed in spawn rooms so the bots use them right as they spawn. You can have different routes setup for each team however if a team is playing defense the whole time in map, then you shouldn't need route actions for that team.
Deleting Routes
Like Actions and Nodes, Routes can't be deleted at them moment either. But they can be setup to where there not used by anybody and that's similar to deleting them. The first step is to either move it or leave it where it is. After that you'll need to set the Routes action link number and team values to -1. So to do this let's say you want to remove route node 1 from the map. Open the console and enter the command /route_team 1 -1 then hit enter, then enter the command /route_action 1 -1 and hit enter. Now the route node won't be used at all and is ignored completely by both teams and all bots.
Moving Routes
Again moving routes is the same as moving actions and nodes. Let's say you want to move route node 3. Stand exactly where you want route 3 moved, open the console and enter the command /route_move 3 then hit enter. The route should now be moved right where you are standing, piece of cake.
Setting a Routes Target Action
Routes won't work unless you specify a target action for the bots to go to, in a simpler explanation the target action is the goal the bots are trying to get to using that route and it's linked alt actions. This can be either a steal, dynamite or escape action. In any case let's say you have action 17 which is to blow up the nuclear transmitter or whatever and you want route 6 to have that action as it's target action. Open the console and enter the command /route_action 6 17 then press enter. Now whenever a bot reaches route 6 it will determine a path to action 17 and go there by following route 6's linked alt roam actions (we'll get into those in a bit).
Remember don't set an invalid action number or an action number for something that isn't an objective action because the bots may have problems. Also make sure not to use this on Spawn or Checkpoint flags because it won't work. And finally, you must have alt roam actions linked for the given route otherwise it won't work either (as before, we'll get into that in a bit)
Route Radius
Route radius uses the same concepts as actions and nodes, once a bot is in a routes radius it's considered to be next to the route in question, we already know all that. By default a route that is placed on the map has a radius of 70.Take a look at the pic below for an example of a route with it's radius visible.
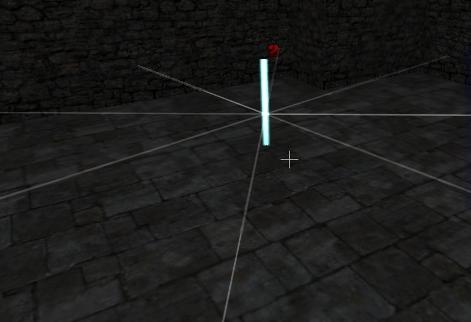
Now remember in order to see the radius lines like above you'll need to enter the drawradius command mentioned in section three of this tutorial. The radius of routes varies, seeing as it is suppose to be placed in spawn rooms and locations, it MUST cover the entire spawn area so it can be anywhere from 100-500+ radius. So being that this is the case you must enter different values until you get it correctly, you'll be able to see the radius lines increase/decrease as you enter different values and you can judge how much area of the spawn is covered by the given radius value.
Now let's just say we want to make route node 4's radius be 450. Open the console and enter the command /route_radius 4 450 and press enter. This will now set route node 4's radius to 450, and that's it. Remember not to have to small of a radius otherwise the bots you want using the route won't use it. Remember in a spawn the bots spawn in random places so you never know exactly where say an engineer is going to spawn so that's why you need to set the radius to cover the whole spawn area.
Defining Route Teams
Routes also go by which team is able to access them. By default when a route is placed in a map it has it's team number set to 0 which means either team can access it. But let's say you wanted only the axis to use one particular route node. Well you can set it up to where they do. In fact by defining teams you can limit access to some route nodes while making other's one's available for the other team. This provides extra flexibility with the routing system. However on most objective maps most route nodes will only be available for one team at a time, but on dual objective maps you may have one's for the axis and some for the allies.
In any case, say you wanted to make route 7 an axis only route. Open the console and enter the command /route_team 7 1 then press enter. Route node 7 will now only be accessible by the axis. To set it to where only the allies would have access to the route you would use a value of 2 instead of 1, and that's it.
Alt Roam Actions
Why aren't these explained in the action section you say? Because these are actions that are ONLY used by the route system so it's only fitting to explain them away in this section. Anyways, alt roam actions kind of work in the same manor as regular roam actions but their different in a way. There placed on multiple paths to instruct the bots to use a certain path to reach an objective. You only need one per available path, you need to place these only where there is multiple paths available to reach an objective and the alt roam actions must be used by a route to be effective. You do not use these in maps that have only one path to the objective, because there is no need for a route system on those kinds of maps.
The bots select them at random so you don't need to set priority or anything like that. They can be turned on in the script or using group ID's or having the active forever setting set at 1 but once their turned on, they don't turn off. A bot will not use an alt roam action unless it's following the route system. These work pretty much like regular roam actions on any other aspect. If none of the alt roam actions or even 1 isn't turned on yet, they won't use the route system until they are. How they work is once a bot enters a route nodes radius and find it can use the route to follow a path to the given objective, it calculates the path to each alt roam node the route is linked to, it then picks one of those paths and proceeds to the alt roam action. Once it reaches the alt roam action it calculates the rest of the path to the target objective and goes there.
It's pretty tough to get the concept, but a great way to get an example is to load up a map like mp_depot and look at those alt roam actions and route nodes because there's some good examples on that map of how alt roam actions are used.
Now let's move onto setting up a alt roam action shall we. Go to the location you wanna place the alt roam action and place the action like normal, you don't need to define the radius you can leave it. You may wanna set the group ID to whichever number you wanna set it at, or to -1 if you want it script activated. After you've done all that, it's now time to set the alt roam action. Let's say you just got done placing action 44 and you want it to be an axis alt roam action. Open the console and enter the command /action_axis 44 9 and hit enter. This will now make action 44 an alt roam action.
Some things to note, alt roam nodes cannot be daisy chained to make bot travel specific paths throughout the map you can only have one per path. You can set an alt roam up to be used by a single team or if both teams can use the route the alt action resides you can make them used by both teams. Alt roam actions follow the same rules, regulations and restrictions as other actions. Also remember you NEED to link these to Routes otherwise the alt roam is useless as well as the route itself. We'll get into how to do that next.
Linking Routes & Alt Roam Actions
Okay we already went into alt roam actions, we've placed them, setup all our routes and everything now it's time to link the routes to the alt roam actions. Keep in mind some of the rules and such mentioned in the alt roam section above and also remember that you can only link up to 6 alt roam actions to 1 route node. The command works much in the same way as the action links command.
Now let's say we setup actions 33, 34 & 35 to be used with route 4, open the console and enter /route_pathactions 4 33 34 35 then hit enter. Route 4 will now be linked to alt roam actions 33, 34 & 35.
And that's all for the Route System, it can be a bit confusing at first but it's really quite simple. It can be a very great way to keep bots focused on the map and help them select different routes to the objectives so that it provides more variety and not only that it may help them from getting killed all the time. It also keeps the defense on their toes as well because you never know where a bot will pop out of. Well next we move onto the very last system Fritzbot currently has "The FritzScript System".
Console Command Quick Lookup
/node_drawHUD 3 - This draws the in-game route HUD and displays info about the closest route near you.
/route_add - This adds a route node at the exact position you are standing.
/route_move <route#> - This moves the specified route to you're current location (i.e. /route_move 4 moves route node 4 to you're current location)
/route_action <route#> <action#> - Sets the given target action to the specified route node (i.e. /route_action 5 27 sets route 5's target objective action to action number 27)
/route_radius <route#> <radius> - Changes the radius of the specified route to the radius given (i.e. /route_radius 8 320 sets route node 8's radius to be 320 units)
/route_team <route#> <team#> - Sets the given route to be accessed only by the specified team (i.e. /route_team 7 1 sets route node to be only accessed by the Axis, a team value of 0 means any team can use it, a value of 2 means only allies can use it, and a -1 value means neither team can use it)
/route_pathactions <route#> <altroam1> <altroam2> <altroam3> <altroam4> <altroam5> <altroam6> - Links the given alt roam actions to the specified route, up to 6 alt roams can be linked to one route (i.e. /route_pathactions 6 13 17 18 19 links alt roam actions 13, 17, 18 & 19 to route 6)
Section VI - The FritzScript System